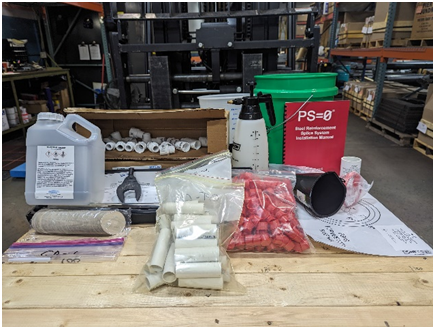
If you’re reading this blog, chances are you already know that PS=Ø® is a mechanical reinforcement splice system that eliminates pour strips. You’ve also probably heard that the PS=Ø® coupler features a threaded bar on one end and a grout-filled sleeve on the other.

Grouting is the final step of the PS=Ø® installation process. Grouting locks the system in place, preventing any further movement.

Let’s take a more detailed look at the grouting process of the PS=Ø® system.

Grouting Materials

Below is the full package you receive when you purchase PS=Ø® system, with grouting materials in bold: 

PS=Ø® couplers
Torque wrench
Threaded grout tubes with caps
Bond breaker and sprayer
Non-shrink grout
Grout mixing tool
5-gallon mixing bucket
Slump sheet
Grout funnel

  • Threaded Grout Tubes: When you first receive your PS=Ø® system, you’ll notice that there are two holes on top of the coupler. This is where the threaded grout tubes will be inserted. Grout tubes should be inserted after the threaded rebar has been torqued into the coupler. The grout tubes are cut to slab height to make finishing the concrete easier.

  • Non-Shrink Grout: Non-shrink grout is a hydraulic cement grout that, when hardened under stipulated test conditions, does not shrink. Its final volume is greater than or equal to the original installed volume, which helps with load transfer.

  • Grout Mixing Tool: Our grout mixing tool is a drill attachment that allows you to mix the grout to the required consistency.

  • Slump-Measuring Tool: The slump-measuring tool (slump sheet) allows you to test flowability to get the grout to the correct viscosity before pouring grout into the grout tubes.

  • Grout Funnel: The grout funnel allows the mixed grout to be easily poured into the grout tubes without spills.

Grouting the PS=Ø® coupler

Let’s take a look at how to grout your PS=Ø® system. (For complete installation instructions, check out our other blog PS=Ø® 101: Part 4 or the official installation manual.)

Grouting begins after the Engineer of Record’s specified amount of time, which allows for concrete shrinkage to occur.  The PS=Ø® Relief Joint opens up between the two slab pours during the specified amount of time

Pro-Tip: The longer you leave the system ungrouted, the concrete will be higher the quality with fewer restraint cracks. 

Grouting Process

1.  Prep for grouting by sealing the bottom of the joint. After the joint has opened up, there will be a small gap between pours that must be sealed prior to grouting. The most common method of sealing the joint is using a backer rod.

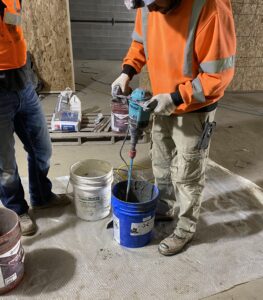
2.   Mix the grout to the required consistency using our Grout Mixing Tool. To mix the grout, you will need:

  • Potable water
  • Slump sheet
  • Grout Mixing Tool
  • 5-gallon mixing bucket
  • Measuring container
  • Funnelt

Pour the required amount of water into your bucket and then slowly add grout to the water, mixing as you go for a flowable consistency. Continue adding grout and mix slowly to avoid creating excessive air bubbles. Do not mix more grout than can be placed in approximately 30 minutes. When the grout has a uniform consistency, it will be ready for a slump test.

Note: The standard working temperature range for the grout is 45°F to 90°F (7°C to 32°C). Refer to the installation manual for specific instructions on what to do if the temperature falls outside of this range. 

3.  Test the flowability of your mixed grout using our Slump Sheet. Using a slump sheet, perform a slump test to get an indication of the consistency and fluidity of the grout batch. When the grout meets the slump requirements, the coupler and joint can be grouted. 

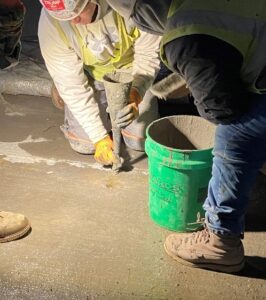
4.  Grout the joint and coupler. To mix the grout, you will need: Place the grout funnel into one of the two grout tubes, and pour grout into the funnel. You will know the coupler is fully grouted when grout comes up from the second grout tube. Directly grout the joint using the funnel.

5. Take grout cube test samples for compression testing. Grout samples should be taken as specified by the EOR.

Once the couplers and joint are grouted, the system will be locked in place, preventing further movement.

Questions About the Grouting Process?

For technical specifications regarding the grouting process, please refer to the official PS=Ø® installation manual. If you have any further questions about grouting the PS=Ø® coupler or joint, please call us at (800) 355-8414. We’ll be happy to answer any questions you may have. 

Interested in using the PS=Ø® system in your next project? Reach out to us to set up a meeting using the phone number listed above, or fill out our contact form and we’ll reach out to you. We look forward to talking with you about how PS=Ø® can reduce costs, accelerate construction, and improve safety on your next project!